Initial Workspace View Appearance Configuration / RiverWare 6.7 / July 2015
Document home:
R:\doc\workspace\2015\InitialWorkspaceViewAppearance.docx
Phil Weinstein, David Neumann, CADSWES. Edit: 7-09-2015
This new configuration option in RiverWare allows the user to:
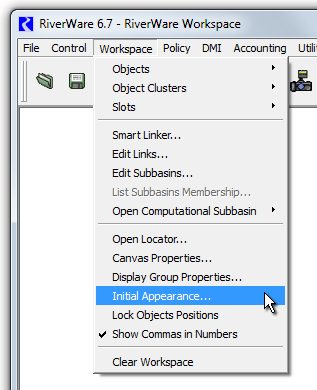
The configuration dialog for this feature is accessed via the RiverWare Workspace's "Workspace" menu. Clicking the "Initial Appearance..." menu item shows the Initial Workspace Appearance dialog.
|
|
All changes made in this dialog are immediately recorded; there is no "Apply" operation. Closing the dialog with the window title bar's red "X" button is equivalent to clicking the "OK" button.
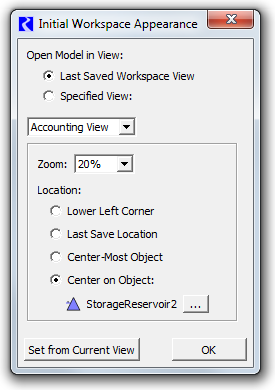
The "Open Model in View" radio boxes support these two options:
The Zoom level and Location algorithm settings are set independently for each of the three views. As just mentioned, the view for which these attributes are edited in this dialog box is set through the view selection combo box. Note that the "Accounting View" option is shown only if accounting is enabled in the RiverWare model.
The discrete zoom levels supported in the workspace can be selected within the Zoom combo box. "100%" is the normal zoom level. Currently, eleven (11) zoom levels are supported, ranging from 20% (zoomed out) to 400% (zoomed in).
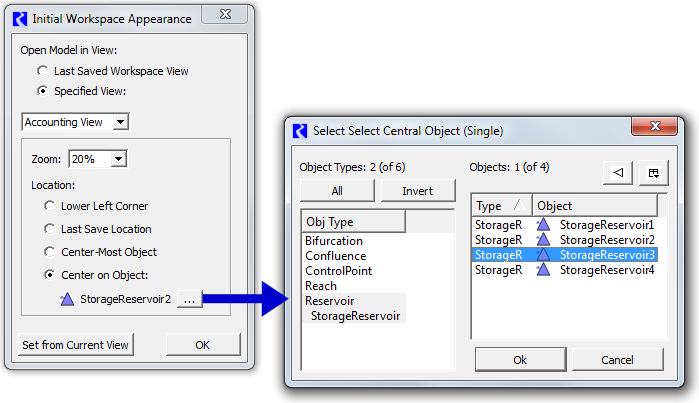
The user can select between these four "Location" settings (as indicated above, separately for each of the three workspace views):
*When "centering" on an object, if the object is near one of the edges of the view's canvas dimensions (within a "half screen"), the view is scrolled such that the object is visible, but not actually centered, as such. This is implemented with just the default behavior of the Qt4 QGraphicsView::centerOn (const QGraphicsItem*) method.
The initial Zoom and Location algorithm settings are applied (when reloading the model file) regardless of which of the two "Open Model in View" modes is selected. In particular, choosing the "Last Saved Workspace View" option (which implements the prior behavior with respect to which view is initially shown) still allows the configured zoom level and initial location algorithm to be applied (but of course those properties will be those associated with the workspace view being shown -- not related to the view combo box setting in this dialog).
Clicking the "Set from Current View" button has these three effects:
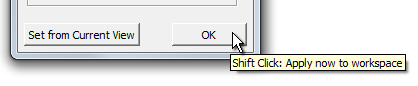
The OK button dismisses the dialog. (Setting values are actually applied to the data model as soon as widget selections are made).
A special function of the OK button is useful for immediately seeing the effect of the initial workspace view configuration setting. Holding down the SHIFT key while clicking the OK button applies the current setting values to the workspace. This demonstrates how the workspace will look after the model is reloaded -- assuming the current state of the workspace, i.e. as if the save operation was done immediately after dismissing this dialog. When clicked in this way (with the SHIFT key held), the dialog is not dismissed. This feature is indicated with a tooltip on the OK button: "Shift Click: Apply now to workspace".
--- (end) ---